Wednesday, June 26, 2013

WIP Wednesday

I normally don't participate in WIP Wednesday, because I am afraid that I will post something and then it will never turn into a Finished Friday, lol.
But I really need some Ice - Cream help.  What flavor looks best on top,


Chocolate

or Pistachio

What do you think?
We have Vanilla, Strawberry and then.....

On other news I am trying to finish my 2nd Diaper Clutch bag so I can write up the tutorial and finish my Crib Organizer with Removable Fabric Baskets and Diaper Clutch, that I had originally made for the Make It Right Challenge.
Linking up to WIP Wednesday at Freshly Pieced

Monday, June 17, 2013

Fabric Baskets

Second Part of Crib Organizer with Removable Fabric Baskets and a Diaper Clutch Tutorial

These fabric baskets can be used separately or part of the crib organizer, you can hang them on a door knob or they can stand alone. 

Cutting Instructions:
 We will be using the top 3 cuts on the right side to make these baskets, first cut off your selvedge and set it aside to use later, make sure the fabric piece is 21" and cut 3 - 8"x21" pieces, take 2 of the pieces and cut them down to 8"x8" and 8"x13", the third piece you will cut 2 - 8"x4.5" and 6 - 8"x2"

Make the above cuts on your solid fabric of choice or some matching FQ's.

Let us also cut up the Pellon fusible it comes in 20 inches-
2 - 7.5"x 7.5"
2 - 7.5"x 12.5"
6 - 8"x 2"
2 - 8"x 4"

All of your cuts should look like this: 
Now fuse the Pellon to the Panel pieces of fabric, we cut them a little smaller so there will be an 1/4" missing around all the edges.
 
Let's take our 2 bottom pieces, the 8"x4.5 and round the corners.

 With all of the pellon fused on your pile should look like this:

I did my cutting and ironing in 1 nap-time.
 
 Okay let's start constructing our baskets, take the 1 Panel front piece and match it with 1 Panel back piece, and sew 1/4", yes 1/4 inch.
It will look like this.
 Do this 4 times, 2 Panel pieces (the outside of the baskets) and 2 inner solid pieces (the inside of your baskets).
Now add your bottom pieces, I sewed the back piece on first leaving a 1/2" on each end and sewing 1/2" in, then I sewed the front to the curved part of the bottom, right sides together and pinning well, I do not have photos of this part, if you need more help, just ask.  Once again do this 4 times, 2 Panel bottoms to the panel "tubes" and 2 solid color bottoms to the solid color "tubes".

The next step will be sewing the inside to the outside fabrics.  Keep your Panel pieces inside out and turn your solid pieces with the right side of the fabric on the outside.  Nestle your solid piece of fabric inside of the panel piece, so that the right sides of fabric are facing each other.
A picture to help.
 Sew around the top at 1/2" from one side to the other, leaving a good 5" gap on the back to add your strap and to flip the fabrics around.  Clip the corners and maybe trim some of the bottom so that it will lay flatter.  You will want to iron the crease at the top so it is easier to top-stitch down.  

I got this far during another nap time.

Lets talk the straps and buttonholes, this was my first attempt at making buttonholes.  It is so easy!  I have no idea what I was afraid of, but if you need help making buttonholes I can make a separate tutorial or there are a lot of videos up on Youtube, just write in what type of machine you have and ask for a buttonhole tutorial. 
 Your straps look like this 8"x 2", 4 of them will be for the organizer panel, and 2 for the baskets.  Organize what is what, I had 2 different solids to go with them the darker solid is for the organizer the lighter on for the baskets.  You should already have the pellon ironed onto the panel pieces, take the right sides of the basket panel pieces and line them up with the right sides of the solids, sew on both long sides 1/8", flip right side out and iron, then topstich 1/4" on both sides.  
The 4 straps for the organizer will be sewn on 3 sides (now this is if your slat openings on your crib are 2" wide which is the case for my friend, you will need to adjust if it is a smaller opening, I hope not).  Again sew 1/8" with right sides facing each other, but sew down one side turn at the bottom, go across and go back up, to make a long U shape, trim the corners and then flip inside out, iron, and topstich around all 3 sides 1/4"
Let's add the button holes now!  Measure your buttons, or if you have a nifty button hole sewing foot then use that.
The 2 straps that are going on the basket sew the button holes in the middle of the strap.  For the 4 straps for the crib organizer panel, sew the buttonhole close to the end of the U part that you sewed.
2 on the bottom are for the organizer and the one on top for one of the baskets.
 I learned this little trick, use your seam ripper to make the button holes being careful not to cut your seam.
Now lets add out straps for the baskets, place them in the middle of the hole you left and topstitch down at 1/8" all around the basket.
 I start at one seam and go all around, then when I make it back to this seam, I turn my basket a little and take 2 stitches down the seam, turn it back, and then sew 1/4" top stitch down just the back portion of the basket.  This way the handles are stitched down twice making them stronger, I again stop at the other end of the seam and leave enough thread for me to thread a needle and do a couple of back stitches by hand.
And your baskets are done!


Last Days of the Tammy Blog Hop

We are on the last 2 days of the Tammy Blog Hop and if you haven't seen any of them yet, you definitely should.
 June 17th (monday)


June 18th (tuesday)


Sunday, June 16, 2013

Sunday Stash

If you are looking for the Tammy Bag Blog Hop, you can find it here.

This week was a wonderful week for getting packages.
I ordered these fabrics in hopes of doing something for Alyce's Kate Spain Blog Hop.
I bought these Terrain fabrics from an Etsy shop called Tipsy Quilters, and I think the girls must have been pretty Tipsy when they made the prices for their fabric, at $4.20 a yard it will be the cheapest you can find.  I asked how much they could get in a $10. package to Greece and they said 2 yards.  So that's what I ordered, here is how the package arrived.
Do you see the total that they billed me $18.40 and the cost of the shipping $16.75, plus 2 yards of fabric, OMG, Shipping is ridiculous!  Since I was going to make 2 of what I am doing I will send 1 to them because really I feel like I stole the fabric from them and if I had more money I would send it, but I don't as is, I was scrimping from the grocery money my husband gives me, 5 euros here and 5 euros there, you get it.  If you need some Terrain fabrics, please give them some love from me and purchase at their Etsy shop, thank you.

The next 2 wonderful packages I won, my very first mini charms from Erin at Sew At Home Mummy, she is the sweetest person ever, I love her blog and she always has great information.
I've never seen charms from Robert Kaufman, I am so excited about them, I need to look up more info.  this package is so new I haven't had time to investigate, but aren't they pretty!

The next was 4 FQ's from Sue at Susan's Scrappy Domain, I won them during the April Shower's Blog Hop.
Pretty, huh, my first Gingham.
I got worried when they didn't arrive, so 3 weeks ago, I sent her an e-mail and she was like "oops I forgot to mail them out and I will send something extra", how sweet is that!
An extra 2 FQ's, SWEET!
From the same fabric line,

I plan on using these and the other 6 FQ's I won for a charity quilt I am making, now I just need to win 6 more FQ's and I will be set.
Do you think they go well together?
All 12 FQ's together, I might take out the butterflies, makes it a little to girly.

Don't forget to enter in the Birthday Giveaway (aka. free fabric)!

P.S. if you are wondering the new price for 6 FQ's to Greece is $12.75, crazy!

Linking up to Sunday Stash, it is over at Dreaming in Patchwork this week.

Saturday, June 15, 2013

Le Challenge - "Maritime"

The Le Challenge for this last month was "Maritime", I really think Lucy and Nat are like on some kind of brain wave length with me, because each month the new challenge is something that I have wanted to do and this just gives me the kick in the "you know what" to get it done.
Her shirt says Maritime, I did NOT make this, she is acting like a pirate.

I have been on a big kick with Maritime stuff and I did  4 (3 sewing related) finishes this last 30 days, really I am not kidding you!
My favorite, although it isn't perfect, but it is for my little girl, was her birthday dress.

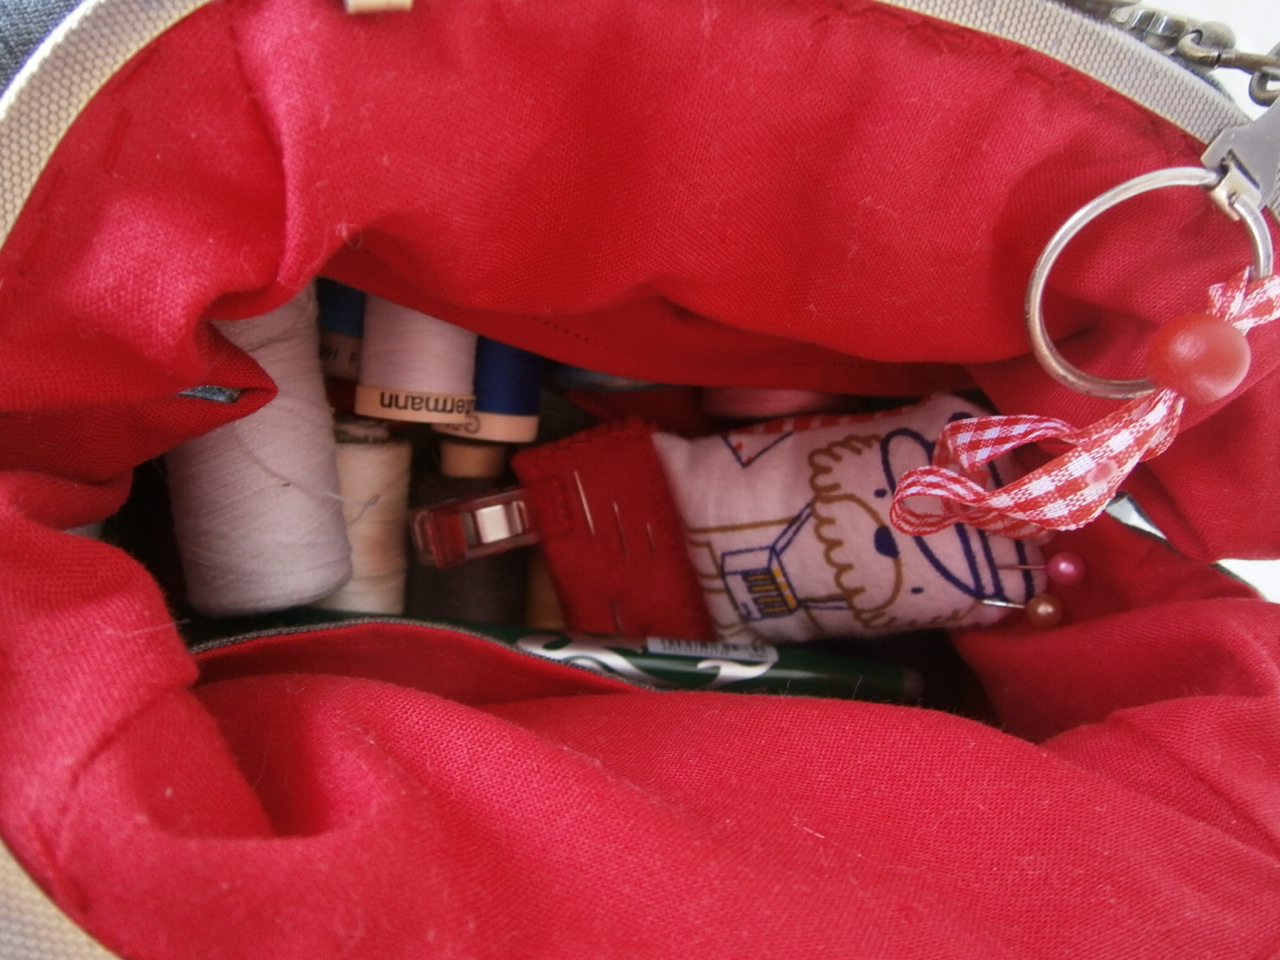
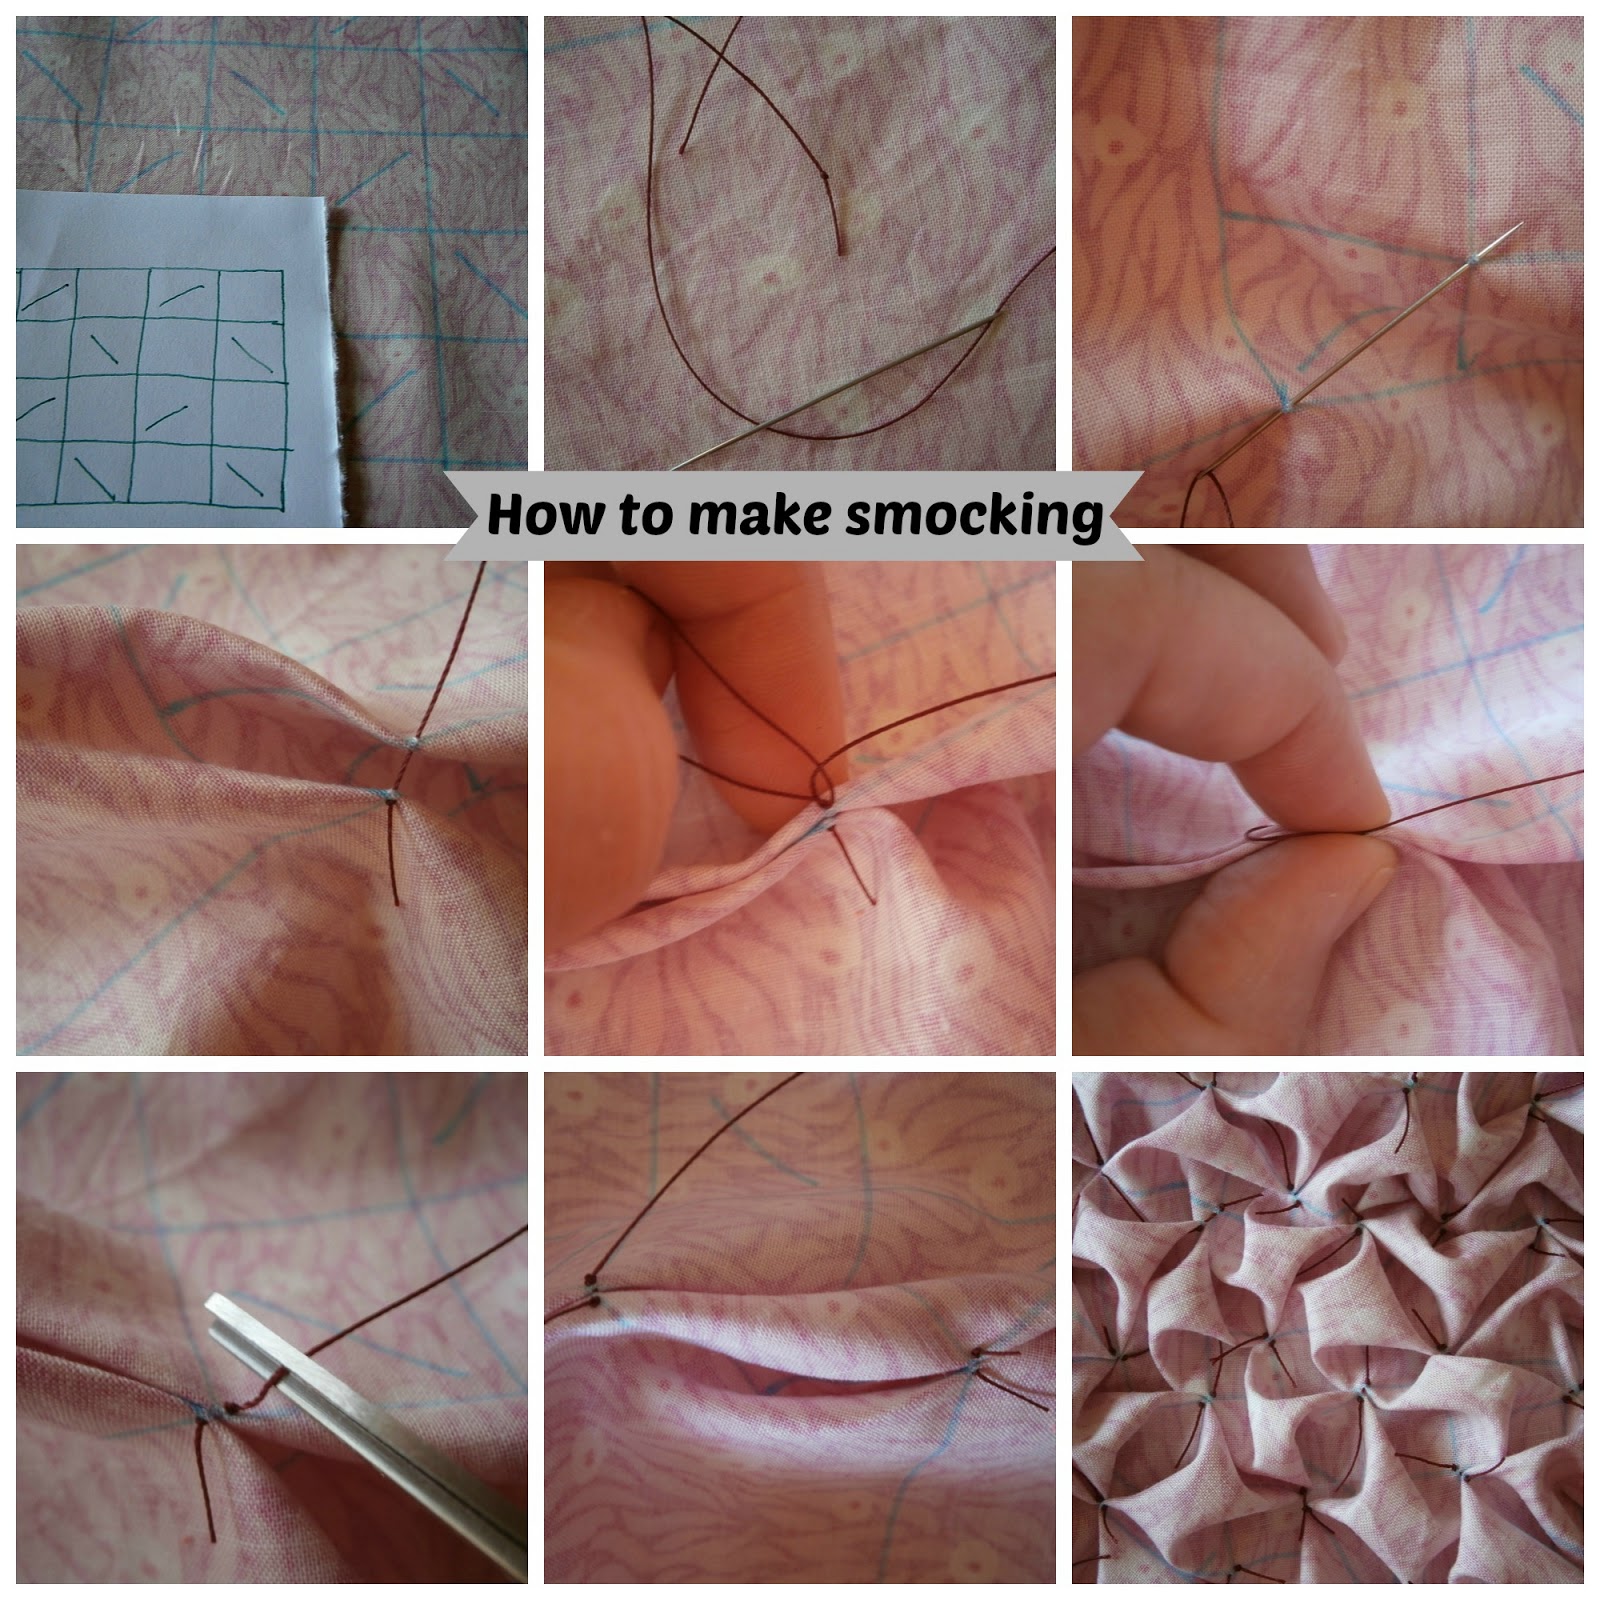
 I did some smocking for the top, you can find my tutorial here, and then the bottom is just an easy French Seam and the shoulder straps are up-cycled t-shirt strips wrapped up like a braid.
A montage, she was entertaining some tourist from Asia and they couldn't stop taking her picture.  Playing with her hat, a little hat dancing and then she was done.
The fabrics are Out to Sea, by Sarah Jane, the top smocking part is in Seaweed in Bloom and the bottom is Sail Away in Bloom.  I got the inspiration from this photo.
source
I hope my little girl looks happier in her dress, what do you think, if not then you have to check out her birthday dress dance and the GIVEAWAY going on.
I think she is pretty, the dress needs work and maybe I will make another one with Sarah Jane's new "Let's Pretend" fabric line.
Thirsty after entertaining the tourist and eating chocolate ice-cream.
Second project, okay it came first, I finished it on May 20th, my Anchor's Aweigh Quilt, very very proud of this one, it is my first quilt.
I even got it finished in time to enter it in the Blogger's Quilt Festival.

3rd Project, I made a wall hanging maritime thing with my leftover scraps and the selvedges of the Salt Water and dress fabrics.
I entered this little puppy into the Ellison Lane Mini Quilt Challenge going on, it is going to hang in the kids room, along with the pillow I have made for them and the quilt.  I need to make curtains (didn't get it done this month) and paint the room.
The tail moves, in front or in back, what do you think looks better?
And the 4th none sewing project, Cardboard Boats, these crates are what we collect the grapes in to make homemade wine and ouzo.   They make great ways to coral the kids toys, the bottom ones are filled with toys and then the kids climb into the top ones to watch TV or just push each other around.  It is a quick clean solution.

 And we are acting like Pirates, in order to do this photo shoot I had to "bribe" the kids, they wanted to play with the tape I used to put these together, so I told them they would have to do a photo shoot first.  The things we do to get pictures up on our blogs, lol.
A lot of grr..ing and rr..ing going on.
I did make Pirate eye mask out of felt
but they didn't want to wear them
you win some battles and lose others.

Crib Organizer Frame

First Part of Crib Organizer with Removable Fabric Baskets and a Diaper Clutch Tutorial

This is super easy to make, and really easy with the panel, but you can use any fabric you want to.

Have you ever done a French Seam, this is what we will be doing with the First Part of the Panel, here are 2 good French Seam tutorials, here and here.

Cut the Panel.
You will be using the left piece for this part of the crib organizer.
 I did not cut the left side selvedge off, do you see the 4 green lines on the left side of the panel.  I folded the panel in half lengthwise (along the 44-45", just halfway) I matched those up and then cut down the middle of the panel, for the first cut, it was about 22  1/2 ".  You now should have a piece of fabric that is 22 1/2 " by 36"

Take that piece and fold it in half (the 1 yard repeat) with the right side of the fabric facing you, match up the boxes on each side, you may need to trim the top to squares things up.  It should now be about 22 1/2" by 18".

Now it is time to do the French Seam, sew up each side with wrong sides of fabric facing each other and the right side facing you and the bottom of the sewing machine, if you leave the selvage on then stitch at 3/8".
For the first row of stitching the right sides of fabric face out.


The most important thing to remember about French Seams is the Pressing, aka, Ironing, YOU MUST IRON THE SEAM TOGETHER DO NOT OPEN THE SEAM!  Press to one side, it does not matter which side.  Ironing is very important and makes a very nice French Seam.

Now cut a little bit at the corner so it turns better and turn your panel wrong sides out and right sides together.  Once again Iron and press so that it lays nice and flat.  Sew a 5/8" Seam.

Turn back out and Press, now to finish your top.
 Once again the Iron comes out, or maybe it never got put away.  I fold my edge in 1/4 of an inch and then again at 1/2".   Then top stitch the seam down.
 
And tada the first part is done, we will had the straps and buttons in a little bit.

This is all Part of The Crib Organizer that I made for a friend of mine who will be having a baby in September, I have entered it into the Make It Right Challenge with Art Gallery Fabrics.

If you would like to pin an image please Pin this one from the contest.


Friday, June 14, 2013

The Tammy Project Bag that became the.......

Dorothy Bag!


Click, Click, Click, there is no place like home!


I picked up the really cute frame from  BagsPurseFrames Etsy Shop, way back when I did the UR Priceless blog hop.  Another one of Madame Samm's wonderful and easy to follow patterns.  The red Gingham was actually a piece of fabric covering a jar of honey.  The red Presencia thread is from the lovely Jane of Janesfabrics Etsy store.  I did a little bit of chicken scratch embroidery stitch (the best embroidery stitch resource you will find, click on the link it will take you to a new window) on the shoes and also used the thread for threading on the handle, it really does make a difference using this thread, so easy.  The wool felt is from MaureenCracknell Etsy shop, she is very sweet and I made the bow kind of using this tutorial but making it way, way smaller.
The front pocket holds my precious 1 roll of Aurifil Thread
The back pocket is kind of hidden, no extra doodads, because it holds

my 1 pair of scissors (kids nails scissors w/curved ends, perfect for EPP Hexies)
There are 2 pockets here, but I did the stitching down the middle before I put the top pocket on, does that make sense, I wanted it to look kind of seamless.

I need to buy the red/white and blue tailer's shears from DOVO, they would be perfect for my "There's no place like home" Dorothy Bag.
The inside became a way to organize this mess.
my poor cake tin, haven't been able to make a cake for a few months.
Some fabric pens and all of the thread my MIL has given to me.
I have plenty of room to put more in, and will use it to put my current hexie projects in, so I can take it to the park and watch the kids play.
Do you see that little guy in there?
No Dorothy would be complete with out her trusty and very hard working Toto.
He's a good dog, he acts as a pin cushion and then has a felt pad at his feet for needles and a place to hold my clips and if you rub his belly he will pick up all of your pins, I hope it tickles and doesn't give him belly "pins".
I put a magnet inside on the underside.
He mostly stays inside of the bag, just in case there are any more Tornadoes.

This is the first time I have finished a project and said, there's not a thing I want to change, I LOVE THIS BAG!  Normally I always want to make something or change it some way, not this one, this is a keeper and all for me!

I must admit I miss the States, okay some people say I am living the dream life in Greece and it is a beautiful country, very safe, no worries about my children being kidnapped.  But I worry about their future in a different way, education is horrible and even after they are educated then they can not find a job.  So I would like them to take my Dorothy Bag and click, click, click their way to a safer future.

It looks like he is throwing the bag at me, but he's not, he's showing the bottom

Follow the Yellow Brick.....
.... Train Station?
Kalampaka is the last stop for this train, so it makes it easy to get here, wish I could say the same about getting away.
Make sure you visit these other fine ladies working on their Tammy Project Bags and give a big cheer to our lovely cheerleader and fabulous Pattern designer Madame Samm!

June 14th - Friday
Jan 

Don't forget to enter in the Birthday Giveaway!

a Rafflecopter giveaway
June Finishes

Tuesday, June 11, 2013

Smocking Tutorial

I recently made a dress for my daughter and used some smocking on top.  There aren't many tutorials out there on how to do it, so I thought I would show you how I did it.
First you need to know the size, for every inch of smocking you want 3 inches of fabric, but stop half way through smocking to see where you are at and if you need less, I did.
I made a grid of 1 inch squares with a water soluble fabric marker from Clover.

Mark on the back of your fabric, and add these dash lines through, this is the direction your needle will go through.  I did 30 inches from left to right and 9 inches down.
Thread needle and knot only 1 end

go from 1 corner to the other following the direction of the line inside the box
I went 1 row up and then the next row done, and so forth.  Make sure you use thread that closely matches your fabric.
Pull through, squishing the ends to meet and forcing the middle outwards.

Start to tie the knot
I pinched my fingers together to make sure the knot was tight
The fabric is nice and tight
Now clip (cut) AND Repeat.
and slowly
The back starts to look like this.
And the front looks like this!
Don't forget to enter in the birthday party giveaway, if you haven't already.

a Rafflecopter giveaway Follow on Bloglovin